Tag Archives: garlic

Put An Egg On It, Part Two: Eggplant Shakshuka

Is 2018 just going to be “one of those years”? It hasn’t been exactly easy so far, personally (don’t even get me started on the political cluster%*@&). I’m not going to get into it all here, but suffice to say that 2018 is bringing the challenges. Cooking is one of the ways I cope—it’s a challenge that I welcome into my life, even when it takes time to get it right.

This shakshuka was in the experimental stage for a while before I deemed it ready for sharing here. Shakshuka—the traditional one, with tomatoes, chickpeas, and feta—is one of my favorite dishes, but even a favorite can use some reinvention. A recipe for eggplant ragout unintentionally provided the inspiration: what if I added eggplant to my shakshuka recipe? From there I took another leap: what if I used mozzarella instead of feta, adding a bit of an Italian vibe to this classic Middle Eastern meal? It sounded delicious , and like something I could easily add to my weeknight repertoire, so I was all in.

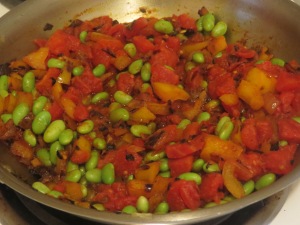
I don’t have anything against eggplant, but I do notice when it’s dominating a dish, and not in a good way. Too much eggplant, and there’s not enough of everything else for it to absorb, which it is so good at. The first version of this dish didn’t have enough tomatoes, and the eggplant, without enough flavors to absorb, was, shall we say, not the most flavorful. Back to the drawing board (or stove, in this case). The next version had double the amount of tomatoes and some oregano, for an extra flavor boost.

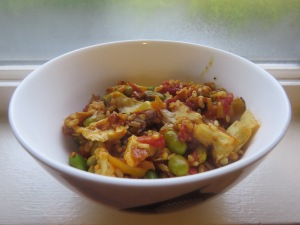
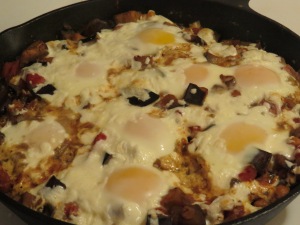
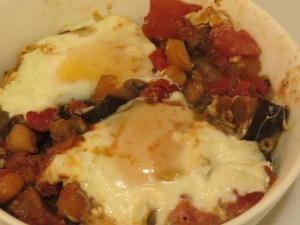
This final version gets the balance right. The eggplant absorbs the tomato and oregano flavors, so you get the entire essence of the dish in every bite. My beloved chickpeas are there, adding texture in a dish of otherwise smooth, soft ingredients. Of course I’m happy with the eggs on top, and covering them with a layer of gooey, melted mozzarella is irresistible. This may not be stereotypical comfort food, but it is for me: a one-skillet dish that’s warm, filling, and makes you feel like all’s right with the world.

Which brings me back to 2018 so far. Even when times get tough, good food brings happiness. Some days joy is harder to find, but it’s there. So here’s to more cooking, and many good things ahead.

Eggplant Shakshuka

1 tablespoon olive oil
1 medium onion, diced
2 cloves garlic, minced
1 teaspoon dried oregano
1 eggplant, cubed
1 28-ounce can diced tomatoes, undrained
1 15-ounce can chickpeas, drained and rinsed
Salt and pepper, to taste
8 eggs
4 ounces mozzarella, grated

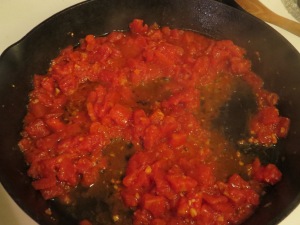
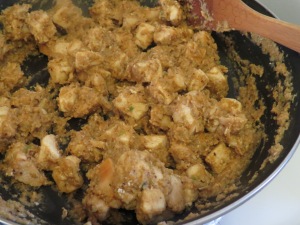
  1. Heat oven to 425 degrees. Heat the olive oil over medium heat in a large, oven-proof skillet. Add the onion and sauté until browned, stirring occasionally. Stir in the garlic, oregano, and eggplant and cook until the eggplant is just starting to soften, about 5 minutes.
  2. Add the tomatoes and chickpeas and sprinkle with salt and pepper to taste. Bring to a boil, then let simmer on medium-low for 15 minutes, stirring occasionally.
  3. Crack the eggs on top of the eggplant mixture, spacing them as evenly as possible. Evenly sprinkle the grated mozzarella on top of the eggs.
  4. Carefully transfer the skillet to the oven. Bake 8-10 minutes for runny eggs and 12-15 minutes for firm eggs.

Fiery Without Flame: Shrimp with Feta and Tomatoes

I don’t like to light my food on fire. I don’t care if it’s crepes suzette, or any number of traditional flambéed dishes. I think it’s an odd—and potentially dangerous—practice. Who decided that dousing your food in liquor and lighting it was a good idea? While I ponder the strangeness of our species’ cooking practices, let me share this brilliant recipe that, despite being given the option, I did not choose to ignite.

Here we are, in the cold of almost-winter, not a fresh tomato in sight (not one worth eating, anyways). Luckily, canned tomatoes step in when we need them, in this case to surround shrimp and feta in a cozy, simple dish that is perfect for those holiday-season nights when you’re burned out on cooking. I didn’t expect the dish to turn out quite so soupy, but I was actually so pleased that it did. It became a special tomato soup, with flavors cranked way past any tomato soup I’ve had before (but let’s face it, I mostly eat the stuff from a can. Sssh, don’t tell anyone).

The recipe headnote mentioned fire, but I thought Amanda Hesser was just referring to the pepper flakes. Maybe she was, but the final step in the recipe has you pour in ouzo, an anise-flavored liqueur from Greece. And then: “if desired, ignite it.” Nope, definitely not desired. First, there’s the aforementioned lack of interest in seeing my food in flames. Second, is ouzo something you can find at a local grocery chain? If not, it didn’t seem worth tracking down, and if I did get it, I’d probably end up with more than I needed, desperately trying to pawn it off on unsuspecting houseguests.

Luckily, this dish doesn’t need the liqueur at all. It’s hard to believe such intensely good flavors come from such a basic set of ingredients. The three main ingredients—shrimp, feta, tomatoes—go fantastically together, but it’s the oregano and red pepper flakes that elevate the dish, adding herbal depth and warm spice. There’s the unlikely addition of clam juice, but just go with it; I’ve found it essential in seafood stew. Next time I make this, I’ll probably stir in cooked brown rice, or serve it on the side, so I can stretch this goodness over multiple meals.

Wherever the holidays find you, in whatever emotional state, I wish you some quiet moments to give balance to the busyness. In such moments, dishes such as this one provide a kind of solace, or perhaps just a preamble to a big celebration. I wish us all joy wherever we can find it.

Shrimp with Feta and Tomatoes
Adapted from The Essential New York Times Cookbook

1 cup brown rice (optional)
¼ cup olive oil
2 large cloves of garlic, minced
1 28-ounce can diced tomatoes, drained
¼ cup clam juice
1 teaspoon dried oregano
¼ – ½ teaspoon red pepper flakes, to taste
Salt and pepper, to taste
1 pound cooked shrimp, tails removed
1 cup crumbled feta cheese

  1. If serving with rice: Combine rice and 3 cups water in a medium saucepan. Bring to a boil, then reduce heat to medium and let simmer until the rice is tender and all of the water is absorbed.
  2. Heat oven to 350 degrees. In a large, oven-proof skillet, heat the olive oil over medium heat. Add the garlic, stirring often until lightly browned. Add the tomatoes and let simmer for 3 minutes, stirring often.
  3. Stir in the clam juice, oregano, pepper flakes (use the larger amount if you want it spicy, the smaller for mild), and salt and pepper to taste. Stir in the shrimp until well combined. Sprinkle the feta evenly on top.
  4. Transfer the skillet to the oven. Bake for 10 minutes or until bubbling.

Visions of Salad: Peanut Chicken with Kale

Most people probably wouldn’t look at a recipe for chicken kebabs and immediately think, I could turn that into a salad! But where’s the fun in being like most people? I’d been hankering for a salad with chicken and a peanut-based sauce,  and no fear of being different was going to stop me.

As often happens, it all started in a very different place from where it ended. I saw a recipe in Bon Appetit for a stir-fry with chicken, greens, and peanuts. Before looking at the recipe in depth, my imagination skipped ahead to a peanut sauce covering dark green kale. The contrast of a smooth peanut sauce and a slightly bitter green seemed irresistible (kale is always so fun to dress up). Then I actually looked at the recipe and didn’t see what I wanted. So, like the persistent cook that I am, I took the kale base idea and went searching for a peanut sauce and chicken recipe to top it.

It wasn’t long before I found a potential recipe in What to Cook and How to Cook It. It was for chicken kebabs, but the sauce was what got me. I already have a peanut sauce recipe in my repertoire, but why not try another one? This sauce uses the food processor for the first part, but then the mixture gets sautéed in a pan for a bit (you can use the pan you sautéed the kale in, so this extra step isn’t going to create more dishes). Then you add the peanut butter, water, and fish sauce, and let heat do its magic, melting the peanut butter into a sauce flavored with garlic, jalapeno (seeds removed, unless you want it extra hot), garlic, and cumin.

I know this begs the question: which sauce is better? Well, they’re both great. This peanut sauce is thicker than my previous one, which makes it perfect for coating diced chicken (the other sauce, used in a chicken and cabbage salad, seems better as a salad dressing, since it’s runnier).  The just-wilted kale takes well to both the chicken and the sauce, as I knew it would. A couple extra, not-too-difficult steps are totally worth it here. I’m all about simplifying, so I do not make this statement lightly.

So the next time you look at a recipe and see that it could be something completely different, trust yourself and know you’re not alone. It’s how some of the best things get made.

Peanut Chicken with Kale
Adapted from What to Cook and How to Cook It

1 bunch kale, leaves coarsely chopped (discard stems)
2 large chicken breasts, cut into bite-size pieces
1 small jalepeno chile, seeds removed, coarsely chopped
1 onion, coarsely chopped
2 cloves garlic, coarsely chopped
½ teaspoon cumin
1 tablespoon safflower oil, plus more for cooking
4 heaping tablespoons smooth peanut butter
1/2 cup water
1 tablespoon fish sauce

  1. Heat a little oil in a large skillet over medium-low heat. Add the kale leaves and cook, stir occasionally, until just wilted. Transfer wilted kale to a large bowl. Set aside the pan to use for the peanut sauce.
  2. In a separate skillet, heat a little oil over medium heat. Add the chicken and cook, stirring occasionally, until the chicken is cooked through.
  3. Combine the chile, onion, garlic, cumin, and 1 tablespoon oil in a food processor. Blend until the mixture is smooth with tiny bits of onion still visible.
  4. Heat a little oil over medium-low heat in the same skillet you wilted the kale in. Add the onion mixture and let cook and thicken, stirring often, for 4 minutes. Stir in the peanut butter, water, and the fish sauce (a whisk is great for this part, to make sure everything is well combined).
  5. Add the chicken to the skillet, stirring to coat in the peanut sauce. Serve the chicken over the kale for individual servings, or add all the chicken to the bowl with the kale to make a salad.

Last of Summer: Tomato Bruschetta with Magnificent Marinade

It’s one of the most basic elements of cooking, but it never fails to amaze me: Ingredients prepared a certain way can go from being hated to loved, and vice versa. I’m talking about sometimes subtle changes, innovative uses, the things that (hopefully) really surprise and delight us.

Rosemary isn’t usually my favorite herb—in its full form, it’s too reminiscent of pine needles for my taste. The fragrance is lovely, with something homegrown about it, like a Thanksgiving turkey, but a bite of a piece of rosemary can be overwhelming. So this recipe, with a garlic-rosemary-olive oil mixture dabbed on top of toasted bread, seemed safe, because the rosemary is chopped. Suddenly an ingredient I often steer clear of seemed much more accessible.

It’s the rosemary, and the other ingredients in the mixture (I’m not sure what to call it—a marinade, I guess, since the tomatoes sit in it for a bit too) that make this dish. No offense to the tomatoes, but I could have made a meal of just the bread and the marinade. Each element contributes, but they don’t overwhelm each other. There’s the herbal tone of the rosemary playing with the stronger taste of garlic (which, as we know, works wonders on bread) and the olive oil, salt, and pepper, longtime staples of the table, holding it together. On the tomatoes it also tastes brilliant.

There’s ricotta too, spread on top of the marinade, and bits of prosciutto,  peeking out from under the tomatoes. But as tasty as those are, I’m saying they’re optional. I liked having the prosciutto and ricotta, but without them the tomatoes would feel less crowded. Whether you have fresh garden tomatoes or store-bought ones, let them sing their last song of this summer loudly. Plus, you don’t want to lose the marinade under other flavors.

This summer is almost done.  It’s hard to say goodbye to sunshine (even though some days here in the Northwest have been too hot). So you might as well give good tomatoes their last hurrah for a while.

Tomato Bruschetta with Magnificent Marinade
Adapted from Bon Appetit

6 large tomatoes, cored and quartered
6 tablespoons olive oil
2 large garlic cloves, minced
2 teaspoons finely chopped fresh rosemary
1 teaspoon salt
1 teaspoon pepper
1 10-ounce baguette, cut into 1-inch thick slices
About 1 cup ricotta cheese (optional)
3 ounces prosciutto, coarsely chopped (optional)

  1. Heat oven to 425 degrees. Place tomatoes in a large bowl. In a small bowl, combine the olive oil, garlic, rosemary, salt and pepper. Pour over tomatoes, stirring to coat. Let stand for 5 minutes.
  2. Line a rimmed baking sheet with foil. Place each tomato quarter cut side down on the sheet. Reserve the marinade in the bowl for the bread. Bake the tomatoes for 35 minutes (the skin should be browned in places). Set aside to cool, leaving the oven on.
  3. Place the bread slices on a second rimmed baking sheet. Generously brush the tops with the marinade, making sure to include bits of garlic and rosemary. Toast bread in the oven at 425 degrees for 10 minutes. Let cool for 5 minutes.
  4. Spread 1 tablespoon ricotta on each toast, if using. Top each with prosciutto, if using, followed by tomatoes (do your best to distribute prosciutto and tomatoes evenly among the toasts).

Ordinary Becomes Excellent: Jamaican Beans and Rice

When I first made this dish, I was a sophomore in college, a voracious reader of the weekly New York Times dining pages. In that newspaper cooking school, I found recipes to try and taste and yes, even subject upon my friends, family, and myself. This one I made on the stove at Thomas’s house, in the midst of a party, as you do.

I remember not wanting to put a whole chile into the dish and—I don’t know what inspired this incongruous swap—using premade pico de gallo salsa instead. I didn’t bake the rice and beans in a pot like the recipe said to, instead cooking it on the stove like any normal pot of rice. People came by and took spoonfuls straight from the cooking pot, so apparently it was a hit. But I didn’t make it again (college allowed little time for repeat dishes, barely enough time to squeeze in new ones) until recently, as I mined my recipe notebooks for what’s-old-is-new recipe inspiration.

I thought this time I could try baking the dish in the oven. Along the way I fiddled with amounts, didn’t use parboiled rice, and overall expressed my general disregard for directions that don’t make sense to me (I love cooking rules until they are pedantic, lack logic, and/or are a waste of time). But if one is going to make these changes and disregard the writing on the page, then they must be willing to accept the consequences, which for me were that nothing happened when I tried to bake this dish in the oven. After half an hour, and then more, the rice did not cook, the liquid did not evaporate. It was as if no time had passed at all. So, back to the stovetop it went.

My 20-year-old self’s instincts had proved correct; not only was cooking this on the stove the better option for me, but the use of salsa really makes this dish. It elevates ordinary rice and beans with a little spice and lots of tomatoes. An entire cup of cilantro leaves goes in, perfect for cilantro fans like me (but you could easily leave it out if you’re not part of that fandom). The coconut milk helps too, adding a luxurious element. Coconut anything is so trendy right now, but lest you think I’m pandering to the coconut-buying masses, remember I was making this dish before it was cool.

There’s something nice about cooking from these notebooks, smiling knowingly from this end of my twenties to that time when I knew less about cooking but still dove in—and sometimes knew the best way to do something all along.

Jamaican Beans and Rice
Adapted from The New York Times

1 tablespoon olive oil
1 onion, diced
2 cloves garlic, minced
1 teaspoon chili powder
1 bell pepper, diced
1 15 ounce can kidney beans, drained and rinsed
1 cup brown rice
1 13 ounce can coconut milk, stirred well
2 1/4 cups water
Salt and pepper to taste
1 cup chopped cilantro leaves
1 cup prepared salsa (I prefer pico de gallo style)

  1. Heat olive oil in a medium-sized pot over medium heat. Add onion, garlic, and chili powder, and cook until onions are just starting to brown, stirring occasionally. Add the bell pepper and cook for 3 minutes, stirring often.
  2. Add the beans, rice, coconut milk, water, and salt and pepper.
  3. Bring the mixture to a boil, then reduce heat to medium. Let simmer until the liquid is almost completely absorbed (I like to leave just a little of the liquid for a slightly soupy texture). Stir in the cilantro and salsa before serving.

When a Shortcut Pays Off: Lemon-Pepper Shrimp Scampi

Here is the easiest way I’ve ever found to prepare shrimp. And, even better, it’s a delicious dinner, just as good for serving to guests as it is for a quiet meal alone. Yes, it’s true that cooking shortcuts can sometimes lead to disaster, but in this case (and many others), it’s the tasty path to success.

img_3599One way to streamline a recipe is to skip the first two steps (but always use your best judgment when doing so). The original recipe, from Cooking Light, suggested serving the shrimp with orzo. Orzo can get pretty expensive, which I don’t understand—can someone explain why this pasta-rice hybrid costs so much more than pasta or rice? Anyways, the thought crossed my mind that I could just serve it on rice, but I wasn’t in the mood. Maybe we’d already had a lot of other rice dishes lately. So I skipped that step.

img_3607Next up in the recipe was cooking the shrimp. You can get around this by buying the shrimp pre-cooked. Then it’s just as simple as defrosting the shrimp, removing the tails (I know some people leave them on—for flavor, I guess?—but I always remove them because it’s easier to do that in prep than when you’re trying to eat your dinner), and adding them to a pan of melted butter. If you have raw shrimp, then it’s not much more of a step to cook them; it just adds a bit more time to the recipe. I bought cooked shrimp at the local grocery, so I skipped that step, too.

img_3618What was left of the recipe at this point was melting a tablespoon of butter, adding garlic, then shrimp, lemon juice, and black pepper. In case you were not aware, a lemon-butter sauce does wonders for shrimp, just like it does with other seafood (lobster and clams come to mind first). The pepper adds a bit of bite, balancing out the silky butter; the pepper spice and citrus zing don’t overwhelm, they just contribute the best flavors of ingredients that seem made to liven up the humble shrimp.

The shrimp need an accompaniment to be a full meal, so I served them with a spinach, chickpea, and mozzarella salad. You could also serve them on rice (or orzo, if that’s in your budget), pasta, roasted veggies…whatever you do, it will be one of the best shortcuts you’ve ever taken.

Lemon-Pepper Shrimp Scampi
Adapted from Cooking Light

1 tablespoon unsalted butter
2 teaspoons minced garlic
1 pound cooked shrimp, tails removed
2 tablespoons lemon juice
¼ teaspoon black pepper

  1. Melt the butter in a large skillet over medium heat. Add the minced garlic and cook for 30 seconds or until it just starts to brown, stirring often.
  2. Add the shrimp, lemon juice, and black pepper to the pan. Cook, stirring occasionally, until the shrimp are heated through.

Cook to Feel Better: Chicken and Bread Salad with Tomatoes and Basil

Oftentimes, cooking is one way I express my joy in my life. But there are other times when cooking lifts me up out of a sad mood or a tough time, even if just for a little while, by giving me focus and purpose. It was with this latter mentality that I went into making this salad.

IMG_9058I won’t go into all the details—this is not a tell-all blog, and there isn’t much at all to tell. You know it: there’s just days when you don’t feel so great. So I took some time to lie down, talk to Thomas, and look at cute pictures on Instagram. It was my turn to cook dinner, but Thomas offered to order some Thai food instead (side note: he’s the best) and I was tempted to take him up on his offer. But something made me reconsider. “I want to cook,” I said.

IMG_9073I went into the kitchen and started slicing chicken, which I put in a skillet sizzling with olive oil. I cut half a baguette into cube-like pieces (it’s not as if any were perfect squares—let’s be realistic, people), tossed them with olive oil, and put them in the oven to toast. Just the smell of fresh bread and olive oil brought some peace—it reminded me of downtown Seattle restaurants where they serve good bread with olive oil and balsamic for dipping. What a revelation that was, the first time that simple delicacy was placed in front of me.

IMG_9094I mixed together a basic olive oil, garlic, and red wine vinegar dressing. Then I sliced basil, breathing in the familiar, delicious scent. I sliced little grape tomatoes in half, and alongside the basil, they looked like the jewels of summer. This combination goes beautifully with the toasted bread, crunchy and crisp (and now you have a recipe for homemade croutons!). The chicken makes this salad a dinner rather than a side, but it could easily be replaced by (or supplemented with) pieces of fresh mozzarella, to complete the caprese trio.

Once we sat down to dinner, I felt a sense of relief—not that my mood had changed completely, but I’d engaged my mind in something positive and, as a result, was reminded of one of the many good things in my life now. Being myself means being sad when I’m sad, but also enjoying everything that makes it great to be me.

Chicken and Bread Salad with Tomatoes and Basil
Adapted from Canal House Cooks Every Day

8 tablespoons olive oil
2 chicken breasts (about 1.5 pounds total), cut into bite-size pieces
Salt and pepper, to taste
4 cups bite-size baguette pieces (or other artisan bread)
1 large garlic clove, minced
2 tablespoons red wine vinegar
1 tablespoon lemon juice
0.6 ounces basil leaves, sliced thin
10 ounces grape or cherry tomatoes, halved

  1. Heat 1 tablespoon olive oil over medium heat in a medium skillet. Add the chicken and cook, stirring occasionally, until cooked through. Season with salt and pepper. Remove from heat.
  2. While the chicken cooks, toast the bread: Heat oven to 400 degrees. Toss the bread pieces in a large bowl with 5 tablespoons olive oil. Spread in one layer on a baking sheet. Bake for 10 minutes or until golden.
  3. To make the dressing, combine the garlic, red wine vinegar, lemon juice, and 2 tablespoons olive oil in a small bowl. Whisk well to combine.
  4. In the same bowl you tossed the bread in, combine the chicken, toasted bread pieces, basil, and cherry tomatoes. Pour the dressing over and toss well to coat.

From Flop to Fantastic: Veggie Paella

The first attempt at this dish was an absolute flop. It was not the kind of flop that we could still enjoy, even if it wasn’t worthy of a blog post. The majority of this first round—a skillet full of burnt onions and bell pepper; an undercooked mess of rice that was supposed to simmer in broth and tomatoes but never transformed into something edible—filled the compost pail, not our stomachs.

IMG_8651Full disclosure: I was trying to do laundry and other chores while I made this dinner, which led to neglect of the vegetables.  I can’t blame the recipe for that part. I was frustrated, but as with most things in life, it’s better to learn from rather than dwell too long in the past. I made a few changes to the recipe to streamline and simplify. I made sure to get shelled edamame to avoid an extra prep step. I committed to the cooking without trying to get too many other things done at the same time. I was ready to try again, armed with a revised recipe and refreshed optimism.

IMG_8670Everything was going along fine at first (the onions and bell peppers lightly browned, not burned to a crisp) until an almost-disaster struck. The rice once again would not cook. It simmered in a skillet with hot vegetable broth, and even as the broth evaporated, the rice hardly softened. I kept adding more broth and when I ran out of broth, I switched to water. Only when the rice was cooking in a bath of mostly water did it actually start to transform into tender grains. A quick Google search doesn’t indicate that this is a known issue. I’ve certainly never heard of it, but I changed the liquid from broth to water in the recipe to avoid this strange phenomenon next time.

IMG_8677After that hurdle, the recipe went along beautifully. Something I love about this dish—about all stir-fry-like rice dishes, really—is that it contains such a variety of spices and ingredients, and every bite is savored because of it. The turmeric gives the paella a curry vibe, but there’s paprika too, with its subtle smokiness. The artichoke hearts liven this dish up with their upfront flavor, and the edamame makes a nice stand-in for peas, for those of us (ahem, me) who don’t want peas in their rice but happily welcome other green things.

I still remember the frustration of having to toss out a meal that didn’t work, but somewhere in that frustration was a spark of resolve: this will work, I just have to figure out how. Sure, from an efficiency perspective it would be great if everything worked out the first time. But we all know that’s not going to happen. A recipe flop is a reminder that there’s more to try and learn. Cooking has no shortage of that.

Vegetarian Paella
Adapted from Plenty

3 cups water
1 cup uncooked brown rice
2 tablespoons olive oil
½ onion, diced
1 bell pepper, diced
2 cloves garlic, coarsely chopped
¼ teaspoon paprika
½ teaspoon turmeric
1/8 teaspoon cayenne pepper
¾ cup shelled edamame
1 14.5 ounce can diced tomatoes, drained
1 13.75 ounce can artichoke hearts, halved

  1. In a medium saucepan, bring the water to a boil. Add the rice, reduce heat to medium, and simmer until all of the liquid is absorbed. While the rice cooks, prep the rest of the ingredients.
  2. Heat the olive oil in a large skillet over medium heat. Add the onion and sauté for 5 minutes, stirring every minute or so. Add the bell pepper and cook for an additional 5 minutes, stirring occasionally.
  3. Add the garlic and cook for another minute. Stir in the paprika, turmeric, and cayenne. Add the edamame and tomatoes, allowing them to warm up.
  4. Stir the cooked rice and artichoke hearts into the skillet mixture.

Tomatillo Treasure: Tacos with Salsa Verde

In the spirit of expanding my horizons and whatnot, I’ve lately experimented with ingredients I don’t use often. One of these was mascarpone cheese. Another was tomatillos, which resemble a green tomato and are wrapped in a papery husk oozing sticky sap. If you got past “sticky sap” and are still reading, congrats, because this unusual vegetable transforms into an excellent sauce.

IMG_8314Tomatillos are members of the nightshade family, and are a longtime feature of Mexican cuisine (a really long time—they were favored by the Mayans and Aztecs, or so Wikipedia tells me). I’d only used them once before, and it was to make these tacos in college. I didn’t use tomatillos again until just recently, and that’s a shame, because salsa verde—the most common use for tomatillos—deserves a place on tacos, burritos, nachos, chicken, and anything else you can think of that works.

IMG_8321I began by broiling the tomatillos, onion, bell pepper, and garlic. Broiling for more than a minute or two makes me nervous. When I think about it I picture a grilled cheese sandwich emerging from the oven blackened after an attempt to broil it. That image has come to represent all my broiling anxieties, which I had to set aside in order to make this meal. The promise of something delicious often wins over worries (not unfounded, mind you) about burning the food. Luckily, it all turned out fabulous: the tomatillos were pleasantly charred, the thin crescents of onion cooked to perfection.

IMG_8337From there, the recipe was less stress-inducing. I blended the tomatillos with a generous bunch of cilantro leaves, which weave their distinctive flavor throughout the sauce. It’s vibrant, as bright and pleasant as new spring leaves. Served on top of beans, cheese, and roasted pepper and onion, the sauce elevates this meal to something beyond—and better than—a regular weeknight taco. (Full disclosure: I added more cheese to my tacos after taking these pictures.)

Tomatillos may not look like much, tucked away in the produce section (well, that’s how it is at our local grocery), covered in muted green husks that belie their ability to transform into a versatile sauce. Once you discover them, I think you’ll see why they have such staying power.

Tacos with Salsa Verde

Olive oil for greasing the baking sheet
¾ pound tomatillos (about 6), husks removed
3 garlic cloves, peeled
1 onion, sliced into crescent strips
1 bell pepper, sliced into strips
1 cup chopped cilantro leaves
1 15-ounce can black beans, drained and rinsed
Corn tortillas
1 avocado, sliced
1 cup (or more) grated white cheddar cheese

  1. Heat oven broiler. Lightly grease a baking sheet with olive oil. Spread whole tomatillos and garlic cloves and sliced onion and bell pepper on the baking sheet. Broil for 6 minutes. Remove from oven, stir vegetables, and return to oven to broil 6 minutes more. The tomatillos should be charred in places and the onion and pepper should be soft and browned in some places.
  2. Place cilantro leaves and roasted tomatillos and garlic in a food processor and pulse until a smooth sauce forms.
  3. In a small saucepan, heat the beans over low heat. Heat the corn tortillas in the microwave or in the oven on low heat.
  4. To assemble the tacos, place a couple small spoonfuls of black beans on a corn tortilla. Top with a couple bell pepper strips and onion slices. Top with a tablespoon or so of the salsa verde, avocado slices, and cheese. Repeat until the fillings and sauce are used up.

Inspiration from the Food Court: Baked Falafel

When I think of falafel, I think of the food court at the Westlake Mall in downtown Seattle. There, on shopping trips with my friend Laura, we would stop for lunch (she would get Indian, I always opted for the gyro place). We haven’t been to the food court in a while (though we still go shopping), but the memory is still there, of watching the man behind the counter fresh-fry falafel and serve them in a gyro with tzatziki.

IMG_8197Inevitably, the question arose: What about making falafel at home? I knew I’d rather bake the falafel, in the interest of health and minimal kitchen messes. So I turned to a recipe from one of my college notebooks and got to it. Things were off to a good start when I saw that the falafel contain many of my favorite ingredients, like chickpeas, bulger, cilantro, and cumin. When I’m using such delicious, basic foods, it’s hard to imagine that much could go wrong.

IMG_8213Then it came time to mash the ingredients into a mixture I could shape into patties. The recipe said to “mash until well blended” after combining the chickpeas, cilantro, green onions, and other seasonings. This proved difficult, especially as the chickpeas don’t take well to being mashed and instead break apart or slide out from under the masher. I made it through that frustrating bit, but the second time around I put the whole mixture in the food processor to save myself the trouble. Can we stop for a moment and acknowledge the greatness of the food processor?

IMG_8222So I wasn’t going to mash my chickpeas by hand, but I think the resulting texture after a whirl in the food processor strikes that perfect balance between smooth and chunky, a puree with bits of chickpea still visible. This translated well to the final product, thick patties with a crunchy exterior and soft, slightly crumbly interior. The bread I bought said it was pita but was actually flatbread without a pocket, so I wrapped the bread around the patties with tahini spread on top (incidentally the tahini assisted in keeping the bread in place when wrapped around the patties).

I suggest experimenting with different sauces for the falafel patties. Tahini by itself was a little too bland, and next time I’m going to stir in some lemon juice for extra flavor. You could spread hummus on top, and enjoy chickpeas on top of more chickpeas. I won’t dissuade you.

Baked Falafel
Adapted from Cooking Light

¼ cup uncooked bulgur
2 15-ounce cans cooked chickpeas
½ cup chopped cilantro leaves
¼ cup finely diced green onion
2 tablespoons all-purpose flour
1 tablespoon cumin
1 teaspoon chili powder
3 cloves garlic, minced
Olive oil for greasing the baking sheet
Pita breads or flatbreads
Potential garnishes: Tahini, lemon juice, Greek yogurt, hummus, hot sauce

  1. In a small saucepan, bring ½ cup water to boil. Add bulgur, cover, and remove from heat. Let sit off the heat until all of the water is absorbed and the bulgur is tender.
  2. In a large bowl, stir together the chickpeas, cilantro, green onions, flour, cumin, chili powder, and garlic. Blend in batches in a food processor until you have a smooth mixture with bits of chickpea pieces throughout. Place blended chickpea mixture in a large bowl and stir in the cooked bulgur.
  3. Heat oven to 425 degrees. Lightly oil a baking sheet. Scoop ¼ cup of the mixture out of the bowl. Shape it into a ball and flatten the ball slightly to form a patty. Place on prepared baking sheet. Repeat with remaining chickpea mixture, placing the patties about 1/2 inch apart.
  4. Bake falafel patties for 12 minutes. Flip each patty and bake for an additional 12 minutes. Let cool for 10 minutes before serving.
  5. Place one patty in the pocket of a pita (or wrap a flatbread around it) and garnish with the accompaniments of your choice.